
CSS
static/css/style.css
@CHARSET "UTF-8";

@import url(http://fonts.googleapis.com/earlyaccess/nanumgothic.css);
@import url(http://cdn.jsdelivr.net/font-nanum/1.0/nanumbarungothic/nanumbarungothic.css);

html{overflow:scorll;}
html, body, div, h1, h2, a, form, table, caption, thead, tbody, tr, th, td, submit {
	margin:0; outline:0; border:0; padding:0; font-size:100%; vertical-align:baseline; background:transparent;
}
body {
	font-size:0.875em; line-height:1.5; color:#666; -webkit-text-size-adjust:none; min-width:320px;
	font-family:'NanumGothic','나눔고딕',dotum, "Helvetica Neue", Helvetica, Verdana, Arial, Sans-Serief;
}
h1, h2, h3 {font-size: 1.5em;}
p{margin:0; padding:0;}
ul{margin:0;}
a:link, a:visited {text-decoration:none; color: #656565;}
input{vertical-align:middle;}
input:focus {outline:0;}
caption {display:none; width:0; height:0; margin-top:-1px; overflow:hidden; visibility:hidden; font-size:0; line-height:0;}

.container {max-width:1024px; margin:30px auto;}
.board_list {width:100%; border-top:2px solid #252525; border-bottom:1px solid #ccc; margin:15px 0; border-collapse: collapse;}
.board_list thead th:first-child {background-image:none;}
.board_list thead th {border-bottom:1px solid #ccc; padding:13px 0; color:#3b3a3a; text-align: center; vertical-align:middle;}
.board_list tbody td {border-top:1px solid #ccc; padding:13px 0; text-align:center; vertical-align:middle;}
.board_list tbody tr:first-child td {border:none;}
.board_list tbody tr:hover{background:#ffff99;}
.board_list tbody td.title {text-align:left; padding-left:20px;}
.board_list tbody td a {display:inline-block}

.board_detail {width:100%; border-top:2px solid #252525; border-bottom:1px solid #ccc; border-collapse:collapse;}
.board_detail tbody input {width:100%;}
.board_detail tbody th {text-align:left; background:#f7f7f7; color:#3b3a3a; vertical-align:middle; text-align: center;}
.board_detail tbody th, .board_detail tbody td {padding:10px 15px; border-bottom:1px solid #ccc;}
.board_detail tbody textarea {width:100%; min-height:170px}

.btn {margin:5px; padding:5px 11px; color:#fff !important; display:inline-block; background-color:#7D7F82; vertical-align:middle; border-radius:0 !important; cursor:pointer; border:none;}
.btn:hover {background: #6b9ab8;}

.file_list a {display:inherit !important;}
롬복 사용하기
자동DTO 생성을 위함.
다운로드 (lombok.jar) 후 실행
DTO(Data Transfer Object) 생성
board/board/dto/BoardDto.java
package board.boarddto;

import lombok.Data;

//롬복의 어노테이션으로 모든 필드의 getter 와 setter를 생성하고 toString,hashcode, equals 메서드 생성
@Data
public class BoardDto {

	private int boardIdx;

	private String title;

	private String contents;

	private int hitCnt;

	private String creatorId;

	private String createdDatetime;

	private String updaterId;

	private String updatedDatetime;
}
마이바티스 설정하기
설정하는 이유는 자바는 카멜표기법(클래스명은 대문자로시작, 변수나 메서드 이름은 소문자로 시작)을 사용하지만 데이터베이스는 스네이크표기법을 사용하기 때문.
application.properties 추가
# mybatis set
mybatis.configuration.map-underscore-to-camel-case=true
DatabaseConfiguration.java에 mybatis 추가
package board.configuration;

import javax.sql.DataSource;

import org.apache.ibatis.session.SqlSessionFactory;
import org.mybatis.spring.SqlSessionFactoryBean;
import org.mybatis.spring.SqlSessionTemplate;
import org.springframework.beans.factory.annotation.Autowired;
import org.springframework.boot.context.properties.ConfigurationProperties;
import org.springframework.context.ApplicationContext;
import org.springframework.context.annotation.Bean;
import org.springframework.context.annotation.Configuration;
import org.springframework.context.annotation.PropertySource;

import com.zaxxer.hikari.HikariConfig;
import com.zaxxer.hikari.HikariDataSource;

@Configuration
@PropertySource("classpath:/application.properties")
public class DatabaseConfiguration {

	@Autowired
	private ApplicationContext applicationContext;

	@Bean
	@ConfigurationProperties(prefix="spring.datasource.hikari")
	public HikariConfig hikariConfig() {
		return new HikariConfig();
	}

	//application에 설정된 mybatis 설정을 가져오고 자바클래스로 변환한다.
	@Bean
	@ConfigurationProperties(prefix="mybatis.configuration")
	public org.apache.ibatis.session.Configuration mybatisConfig(){
		return new org.apache.ibatis.session.Configuration();
	}

	@Bean
	public DataSource dataSource() throws Exception{
		DataSource dataSource = new HikariDataSource(hikariConfig());
		System.out.println("dataSourec: "+dataSource.toString());
		return dataSource;
	}

	@Bean
	public SqlSessionFactory sqlSessionFactory(DataSource dataSource) throws Exception{
		SqlSessionFactoryBean sqlSessionFactoryBean = new SqlSessionFactoryBean();
		sqlSessionFactoryBean.setDataSource(dataSource);
		sqlSessionFactoryBean.setMapperLocations(applicationContext.getResources("classpath:/mapper/**/sql-*.xml"));
		sqlSessionFactoryBean.setConfiguration(mybatisConfig()); //여기도 추가

		return sqlSessionFactoryBean.getObject();
	}

	@Bean
	public SqlSessionTemplate sqlSessionTemplate(SqlSessionFactory sqlSessionFactory){
		return new SqlSessionTemplate(sqlSessionFactory);
	}
}
컨트롤러 생성
board/board/controller/BoardController.java 생성
package board.board.controller;

import java.util.List;

import board.board.dto.BoardDto;
import org.springframework.beans.factory.annotation.Autowired;
import org.springframework.stereotype.Controller;
import org.springframework.web.bind.annotation.RequestMapping;
import org.springframework.web.servlet.ModelAndView;


//스프링 MVC컨트롤러
@Controller
public class BoardController {

	//비즈니스 로직을 처리하는 서비스
	@Autowired
	private BoardService boardService;

	//웹브라우저에서 /board/openBoardList.do 를 호출하면 스프링 디스패처는 호출된 주소와 @RequestMapping 어노테이션 값이 동일한 메서드를 찾아서 실행
	@RequestMapping("/board/openBoardList.do")
	//호출된 요청의 결과를 보여주는 View
	public ModelAndView mv = new ModelAndView("/board/boardList");

	//게시글 목록을 조회
	List<BoardDto> list = boardService.selectBoardList();
	//실행된 비즈니스 로직의 결과 값을 뷰에 list라는 이름으로 저장
	mv.addobject("list", list);

	return mv;

}
서비스생성
board/board/service/BoardService.java & board/board/service/BoardServiceImpl.java 생성
서비스 인터페이스 생성
board/board/service/BoardService.java
package board.board.service;

import java.util.List;

import board.board.dto.BoardDto;

public interface BoardService {

	List<BoardDto> selectBoardList() throws Exception;

}
서비스 생성
만들어진 인터페이스를 가져와 사용함
board\board\service\BoardServiceImpl.java
package board.board.service;

import java.util.List;

import org.springframework.beans.factory.annotation.Autowired;
import org.springframework.stereotype.Service;
import board.board.dto.BoardDto;

@Service
public class BoardServiceImpl implements BoardService{

	@Autowired
	private BoardMapper boardMapper;

	@Override
	public List<BoardDto> selectBoardList() throws Exception {

		return boardMapper.selectBoardList();
	}


}
앞의 컨트롤에서는 @Controller 라는 어노테이션으로 MVC스프링에서 컨트롤임을나타냈다면
현재는 @Service로 서비스를 나타냄.
매퍼 생성
board\board\mapper\BoardMapper.java
package board.board.mapper;

import java.util.List;

import org.apache.ibatis.annotations.Mapper;

import board.board.dto.BoardDto;

@Mapper
public interface BoardMapper {
	List<BoardDto> selectBoardList() throws Exception;


}
쿼리문 생성
\board\src\main\resources\mapper\board\sql-board.xml
<?xml version="1.0" encoding="UTF-8"?>
<!DOCTYPE mapper PUBLIC "-//mybatis.org//DTD Mapper 3.0//EN" "http://mybatis.org/dtd/mybatis-3-mapper.dtd">

<mapper namespace="board.board.mapper.BoardMapper">
	<select id="selectBoardList" resultType="board.board.dto.BoardDto">
		<![CDATA[
			SELECT
				board_idx,
				title,
				hit_cnt,
				DATE_FORMAT(created_datetime, '%Y.%m.%d %H:%i:%s') AS created_datetime
			FROM
				t_board
			WHERE
				deleted_yn = 'N'
			ORDER BY board_idx DESC
		]]>
	</select>


</mapper>
<mapper namespace="board.board.mapper.BoardMapper">
-> BoardMapper와 연결
리스트 View 생성
board\src\main\resources\templates\board\boardList.html
<!DOCTYPE html>
<html lang="ko" xmlns:th="http://www.thymeleaf.org">
<head>
	<meta charset="UTF-8">
	<title>board</title>
	<link rel="stylesheet" th:href="@{/css/style.css}"/>
</head>
<body>
    <div class="container">
    	<h2>게시글 목록</h2>
    	<table class="board_list">
	        <colgroup>
	            <col width="15%"/>
	            <col width="*"/>
	            <col width="15%"/>
	            <col width="20%"/>
	        </colgroup>
	        <thead>
	            <tr>
	                <th scope="col">글번호</th>
	                <th scope="col">제목</th>
	                <th scope="col">조회수</th>
	                <th scope="col">작성일</th>
	            </tr>
	        </thead>
	        <tbody>
	        	<tr th:if="${#lists.size(list)} > 0" th:each="list : ${list}">
	        		<td th:text="${list.boardIdx}"></td>
	        		<td class="title"><a href="/board/openBoardDetail.do?boardIdx=" th:attrappend="href=${list.boardIdx}" th:text="${list.title}"></a></td>
	        		<td th:text="${list.hitCnt}"></td>
	        		<td th:text="${list.createdDatetime}"></td>
	        	</tr>
	        	<tr th:unless="${#lists.size(list)} > 0">
	        		<td colspan="4">조회된 결과가 없습니다.</td>
	        	</tr>
	        </tbody>
	    </table>
	    <a href="/board/openBoardWrite.do" class="btn">글 쓰기</a>
    </div>
</body>
</html>
컨트롤과 연결 부분은 컨트롤단에
ModelAndView mv = new ModelAndView("/board/boardList.html");
DB에 데이터 Insert 후 결과 확인.
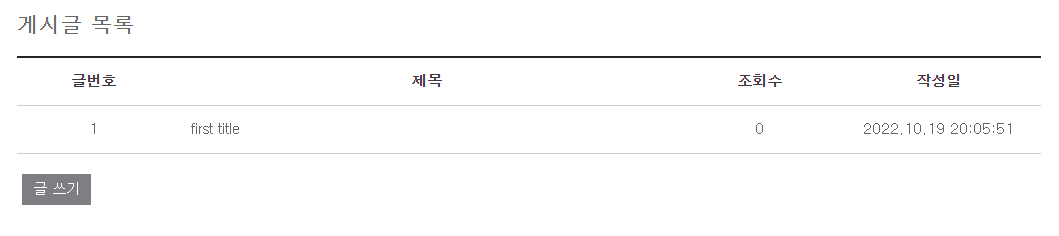
게시글 등록 기능 만들기
게시글 등록 View생성
board\src\main\resources\templates\board\boardWrite.html
<!DOCTYPE html>
<html lang="ko" xmlns:th="http://www.thymeleaf.org">
<head>
<meta charset="UTF-8">
<title>board write</title>
<link rel="stylesheet" th:href="@{/css/style/css}"
	  href="../../css/style.css"></link>
</head>
<body>
	<div class="container">
		<h2>게시판 등록</h2>
		<form id="frm" name="frm" method="post" action="/board/insertBoard.do">
			<table class="board_detail">
				<tr>
					<td>제목</td>
					<td><input type="text" id="title" name="title"></td>
				</tr>
				<tr>
					<td colspan="2">
						<textarea id="contents" name="contents"></textarea>
					</td>
				</tr>
			</table>
			<input type="submit" id="submit" value="저장" class="btn">
		</form>
	</div>

</body>
</html>
컨트롤러에 write 랑 insert 추가하기
	//게시글 등록
	@RequestMapping("/board/openBoardWrite.do")
	public String openBoardWrite() throws Exception{
		return "/board/boardWrite";
	}


	//게시글 Insert
	@RequestMapping("/board/insertBoard.do")
	public String insertBoard(BoardDto board) throws Exception{
		boardService.insertBoard(board);
		return "redirect:/board/openBoardList.do";
	}
14번 라인 - 사용자가 작성한 게시글을 저장하는 service 영역의 메서드를 호출한다.
15번 라인 - 앞에서 특정한 뷰를 호출하기 위해서 return/board/openBoardList.와 같이 뷰 이름을 지정했다. 여기서는 이와 다르게
게시글 목록을 조회하는 /board/openBoardList.do 라는 주소를 호출한다 일반적으로는 입력후 게시글 상세 화면이라 리스트로 이동하기 때문.
서비스와 매퍼에 추가하기
BoardService.java
void insertBoard(BoardDto board) throws Exception;
BoardServiceImpl.java
@Override
public void insertBoard(BoardDto board) throws Exception {
boardMapper.insertBoard(board);
}
BoardMapper.java
void insertBoard(BoardDto board) throws Exception;
SQL 작성
	<insert id="insertBoard_434" parameterType="board.board.dto.BoardDto">
	<![CDATA[
		INSERT INTO t_board
			(
				title,
				contents,
				created_datetime,
				creator_id
			)
			VALUES
			(
				#{title},
				#{contents},
				NOW(),
				'admin'
			)
	]]>
	</insert>
id는 BoardMapper랑 맵핑됨.
게시글 상세 화면 만들기
boardList.html 에 목록선택시 상세내용을 조회하는 주소를 호출하도록 수정
<td class="title">
	        			<a href="/board/openBoardDetail.do?boardIdx="
	        				th:attrappend="href=${list.boardIdx}"
	        				th:text="${list.title}"></a></td>
컨트롤(BoardController.java) 에 상세내용 조회하는 로직 추가
	import org.springframework.web.bind.annotation.RequestParam;


    //게시글 상세보기
	@RequestMapping("/board/openBoardDetail.do")
	public ModelAndView openBoardDetail(@RequestParam int boardIdx) throws Exception{
		ModelAndView mv = new ModelAndView("/board/boardDetail");

		BoardDto board = boardService.selectBoardDetail(boardIdx);
		mv.addObject("board",board);

		return mv;
	}
BoardService.java 에 상세내용 조회 추가
BoardDto selectBoardDetail(int boardIdx) throws Exception;
BoardServiceImpl.java 에 상세내용 조회 추가
	@Override
	public BoardDto selectBoardDetail(int boardIdx) throws Exception{
		boardMapper.updateHitCount(boardIdx);

		BoardDto board = boardMapper.selectBoardDetail(boardIdx);

		return board;
	}
BoardMapper.java 에 상세내용 조회, 조회수 추가
	//게시글 상세보기
		//조회수
	void updateHitCount(int boardIdx) throws Exception;

	BoardDto selectBoardDetail(int boardIdx) throws Exception;
조회수추가 및 상세내역 select 문 SQL문 작성
	<update id="updateHitCount" parameterType="int">
		<![CDATA[
			UPDATE
				t_board
			SET
				hit_cnt = hit_cnt + 1
			WHERE
				board_idx = #{boardIdx}
		]]>
	</update>

	<select id="selectBoardDetail" parameterType="int" resultType="board.board.dto.BoardDto">
		<![CDATA[
			SELECT
				board_idx,
				title,
				contents,
				hit_cnt,
				DATE_FORMAT(created_datetime, '%Y.%m.%d %H:%i:%s') AS created_datetime,
				creator_id
			FROM
				t_board
			WHERE
				board_idx = #{boardIdx}
				AND deleted_yn = 'N'
		]]>
	</select>
상세내역 View 만들기
board\src\main\resources\templates\board\boardDetail.html
<!DOCTYPE html>
<html lang="ko" xmlns:th="http://www.thymeleaf.org">
<head>
	<meta charset="UTF-8">
	<title>게시글 상세 화면</title>
	<link rel="stylesheet" th:href="@{/css/style.css}"/>
</head>
<body>
	<div class="container">
		<h2>게시글 상세 화면</h2>
	    <form id="frm" method="post">
	    	<table class="board_detail">
				<colgroup>
					<col width="15%"/>
					<col width="35%"/>
					<col width="15%"/>
					<col width="35%"/>
				</colgroup>
				<caption>게시글 상세내용</caption>
				<tbody>
					<tr>
						<th scope="row">글 번호</th>
						<td th:text="${board.boardIdx }"></td>
						<th scope="row">조회수</th>
						<td th:text="${board.hitCnt }"></td>
					</tr>
					<tr>
						<th scope="row">작성자</th>
						<td th:text="${board.creatorId }"></td>
						<th scope="row">작성일</th>
						<td th:text="${board.createdDatetime }"></td>
					</tr>
					<tr>
						<th scope="row">제목</th>
						<td colspan="3"><input type="text" id="title" name="title" th:value="${board.title }"/></td>
					</tr>
					<tr>
						<td colspan="4" class="view_text">
							<textarea title="내용" id="contents" name="contents" th:text="${board.contents }"></textarea>
						</td>
					</tr>
				</tbody>
			</table>
			<input type="hidden" id="boardIdx" name="boardIdx" th:value="${board.boardIdx }">
		</form>

		<a href="#this" id="list" class="btn">목록으로</a>
		<a href="#this" id="edit" class="btn">수정하기</a>
		<a href="#this" id="delete" class="btn">삭제하기</a>
	</div>

	<script src="https://ajax.googleapis.com/ajax/libs/jquery/3.2.1/jquery.min.js"></script>
	<script type="text/javascript">
		$(document).ready(function(){
			$("#list").on("click", function(){
				location.href = "/board/openBoardList.do";
			});

			$("#edit").on("click", function(){
				var frm = $("#frm")[0];
				frm.action = "/board/updateBoard.do";
				frm.submit();
			});

			$("#delete").on("click", function(){
				var frm = $("#frm")[0];
				frm.action = "/board/deleteBoard.do";
				frm.submit();
			});
		});
	</script>
</body>
</html>
11~45 : 데이터 전송을 위해 <form> 을 추가
44: 폼을 이용해서 데이터를 전송할 때 입력창(<input>,<textarea> 등)의 내용만 전달됩니다. 기존화면에서는 글을 수정하거나 삭제할 때 꼭 필요한 글 번호를 "hidden" 속성의 <input>에 저장해서 화면의 데이터가 전송될 때 그 번호도 같이 전달되도록 합니다.
47~49: 목록,수정,삭제 버튼을 추가합니다.
52: jQuery를 사용하기 위해서 jQuery 라이브러리를 추가합니다. jQuery를 추가하는 방법은 2가지가 있다.
첫 번째는 jQuery 홈페이지에서 라이브러리를 다운로드하여 추가, 이 경우 원하는 버전의 jQuery 라이브러리를 다운로드해서 사용가능하는 장점이 있지만, 페이지를 호출할 때마다 서버에서 jQuery 를 다운로드 하는데 필요한 트래픽이 발생함.
두 번째는 CDN을 이용하는 방법. jQuery 나 Google 등에서 제공하는 주소만 추가하면 됨. 여기서는 구글에서 제공하는 jQuery를 추가함. 구글에서 제공하는 여러 가지 라이브러리 CDN은 https://developers.google.com/speed/libraries/#jquery에서 서 확인가능함. 단, jQuery 3.x 버전의 경우 IE9, 사파리7이상, 안드로이드 4.0 이상만 지원가능함.
수정 & 삭제 추가하기
BoardController.java에 수정 & 삭제 추가
	//업데이트
	@RequestMapping("/board/updateBoard.do")
	public String updateBoard(BoardDto board) throws Exception{
		boardService.updateBoard(board);
		return "redirect:/board/openBoardList.do";
	}

	//삭제
	@RequestMapping("/board/deleteBoard.do")
	public String deleteBoard(int boardIdx) throws Exception{
		boardService.deleteBoard(boardIdx);
		return "redirect:/board/openBoardList.do";
	}
BoardService.java 에 수정&삭제 추가
//	업데이트
	void updateBoard(BoardDto board) throws Exception;

//	삭제
	void deleteBoard(int boardIdx) throws Exception;
BoardServiceImpl 에 수정&삭제 추가
	//수정
	@Override
	public void updateBoard(BoardDto board) throws Exception {
		boardMapper.updateBoard(board);
	}

	//삭제
	@Override
	public void deleteBoard(int boardIdx) throws Exception {
		boardMapper.deleteBoard(boardIdx);
	}
BoardMapper.java 에 수정&삭제 추가
	//수정
	void updateBoard(BoardDto board) throws Exception;

	//삭제
	void deleteBoard(int boardIdx) throws Exception;
sql-board.xml 에 수정&삭제 추가
	<update id="updateBoard" parameterType="board.board.dto.BoardDto">
		<![CDATA[
			UPDATE t_board SET
				title = #{title},
				contents = #{contents},
				updated_datetime = Now(),
				updater_id = 'admin'
			WHERE
				board_idx = #{boardIdx}
		]]>
	</update>

	<update id="deleteBoard" parameterType="int">
		<![CDATA[
			UPDATE t_board SET
				deleted_yn = 'Y',
				updated_datetime = Now(),
				updater_id = 'admin'
			WHERE
				board_idx = #{boardIdx}
		]]>
	</update>
삭제시 delete 하지 않고 삭제여부 데이터 값을 Y 으로 바꿈.
4장을 마무리 하며..
전체적인 흐름의 구조를 이해.
View - Controller - service / serviceImpl - sql - Dto
html로 View를 구성
Controller 에 주소값과 service를 맵핑시킴
service에서는 메소드명만 명시해 놓고 실질적으로는 Impl에서 작동
Impl에서 sql 맵핑
Dto에 원하는 데이터 값을 담아 다시 View로 보냄.
end.